A Life Change, Part One


I’ve posted in the past about doing a juice cleanse to get healthy.

I’ve posted weekly updates about exercise and motivation and the avoidance of sugar.

I’ve posted about our family’s adventures in trying a Paleo diet.

In all of these posts, there was a tale of moderate success to be told.  I even described myself as a “big fan of healthy living” in my About Me.

But all of these things came to an end in one way or another.  Juicing felt great at first, and it was a good way to jump start better eating habits.  But, honestly, slamming your body with that much sugar, albeit natural sugar, had its ups and downs.  I was cranky and hungry a lot. WE were hangry people.  And being hangry is not a great way to sustain a healthy lifestyle.  Exercise was fine, when I could manage to fit it in somehow.  I tried to do home video workouts and attempted to go running early in the morning when I could.  The video workouts were not very motivating for me, and it was difficult to keep kids at bay while I did them.  I was constantly interrupted or worse, observed entirely too closely, and the workouts became a thing of the past.  Running, well, it just wasn’t for me.  I trained for a 5K and successfully did it; then I lost interest.  Also, PNW winters are no fun for running.  I admire people who do it, but I am just not one of those people.  The Paleo experiment was interesting.  It was difficult to get the family on board, and it was expensive to be eating that much protein all the time.  We did it exclusively for almost three months and then gradually added back in some dairy and some grains.  Paleo was helpful for figuring out some of my body issues, but for our family personally, it was not sustainable for a long time.  We do tend to have meals that are Paleo at least a few times a week, but the rest of the time, we are enjoying brown rice or whole-wheat pasta or roasted potatoes with our proteins and veggies.

Around Thanksgiving time last year, I made an unconscious decision to stop trying.  I wasn’t exercising at all or even attempting to be active beyond what was required of me in my daily life.  I stopped caring so much about what went into our daily meals and snacks.  Delicious homemade meals with extra helpings for all became normal.  I started drinking soda again – sometimes two or three in one day.  I thought nothing of having a venti sugary Starbucks drink and then having a dessert after dinner on the same day.  At Christmas time, my in-laws gave me some money for a gift, and I used it to get myself some new jeans.  Bigger jeans.  A size I had never worn before.  That should have been a wake-up call right there, but I continued right along in my apathetic ways.  I stopped planning meals and fast food sneaked in more and more.  The kids would ask me to come out and jump on the trampoline, but I always had an excuse not to.  They stopped asking.  I would sit inside at the dining room table, folding laundry while watching them through the window.

My clothes got tighter.  I would sit slightly hunched over at church or in other public places so my belly wouldn’t stick out so much.  Still, I could not seem to find motivation to change, to stop this indifferent lifestyle.  I was miserable all the time.  I was exhausted all the time.

One day, I went into the bathroom and took a good long look in the mirror.  I didn’t like the person I saw there.  It was not even about the weight gain, the protruding stomach, the flabby arms, and the round face.  I didn’t like the person inside of me.  Why couldn’t I have any self-discipline in this area of my life?  Why was I willing to throw in the towel so easily?  Why couldn’t I commit to something and stick to it?  The deeper questions came next.  Why do I care so little about myself?  What is it about me that is unworthy of change?

Facing these questions about yourself is hard.  I knew I could go to the computer and google “getting healthy” or “losing weight” and find hundreds of plans for doing so.  But I didn’t need a plan.  In that bathroom that day, I realized I needed a heart change.  The diet books and the exercise videos were not going to help me with that.

Ancient Egyptian Cartouche Bookmark

DSC_0104

For history, the three oldest and I are traveling back through time with The Mystery of History, Volume 1: Creation to the Resurrection by Linda Lacour Hobar. There are a number of reasons why I like this curriculum so much for our family.  First, it works for a variety of ages at the same time.  When I’m reading aloud about the Mycenaens or the Trojan Horse, the older three (and sometimes even the three-year-old) are able to listen and follow along.  Secondly, it starts at creation and goes through history chronologically, making sure to highlight what is going on in various parts of the world at the same time.  It takes away from the disjointed feel of a lot of history curriculum.  The book encourages you to make a timeline so the kids can easily see what happened when.  We are all very visual learners so we have been having a lot of fun making our timeline.  My favorite part of Mystery of History, however, is the plethora of extra projects and ideas included in the text.  In case you couldn’t tell from all my art and experiment posts, I love to do extra projects with my kids!

When we studied early Egypt a few months back, one of the suggested projects was making an ancient Egyptian cartouche bookmark.  (It’s on page 95 in case you needed to find it.)  I loved the idea, and together we came up with our own version of this bookmark. A cartouche was a intricate box that featured pictures representing the name of an important person. You can learn more about cartouches here. 

Here’s what you’ll need to make your own ancient Egyptian cartouche bookmark: a piece of white cardstock, a pencil, scissors, an exacto knife, a glue stick, a hole puncher,  gold acrylic paint, black paint, gold pipe cleaner, and paper towels

DSC_0095

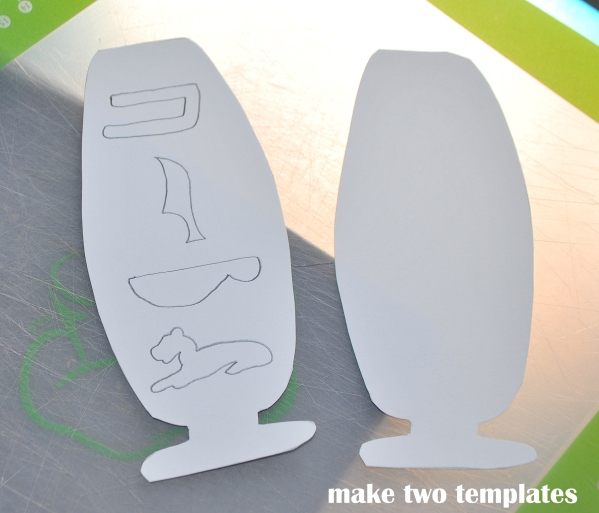
First, you will need to make two templates out of your card stock.  Draw a oval shape like the one above with the “handle” underneath, and cut it out. Then trace it again on your card stock and cut out a second matching shape.  On one of your templates, draw your name in hieroglyphics. (There is a key to the Egyptian alphabet in the back of the Mystery of History book, but if you don’t have that, you can use this easy site. You just type in your name, and it shows you what your name looks like in hieroglyphics.)

DSC_0096

Next, cut out the hieroglyphs with the exacto knife or a very sharp pair of scissors.  Don’t worry if you have some rough edges – they will smoothed out when you paint it later.

DSC_0097

Using a glue stick, glue the template with the hieroglyphs on it on top of the blank template.and let dry. Punch a hole in the top with the hole puncher.

DSC_0099-001

Paint the whole bookmark gold and let dry.

DSC_0101

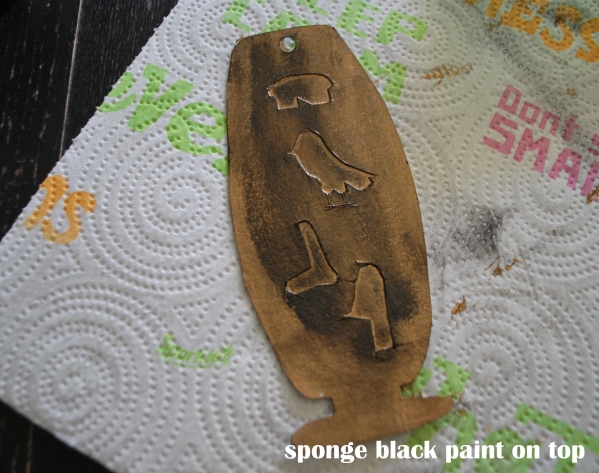
Using a bunched up paper towel, dab a little black paint on top of the gold and smudge it around to give the bookmark an aged look.

DSC_0103

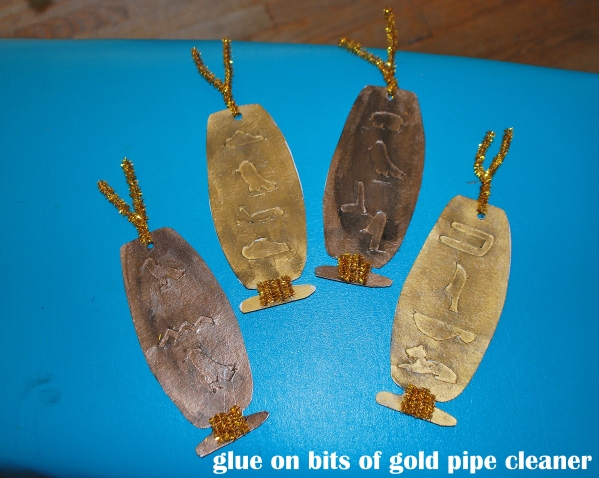
Finally, cut small pieces of the gold pipe cleaner and glue them to the bottom “handle.” Cut a larger piece to insert through the punched hole, and then twist it to secure it.

Now you’ve got a very fancy and mysterious bookmark indeed!  Use it to mark the latest lesson in your history book.


Egg Carton Crafts: Crabs

DSC_0092-001

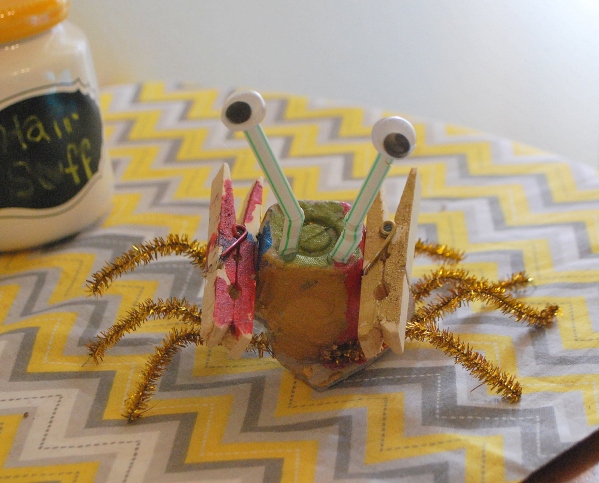
We have made a lot of fun sea creatures with coffee filters (jellyfish, sea horses, and sea turtles); so now it’s time to move on to a new medium.  Our family of six eats a lot of eggs, giving us an egg carton or two every week to be creative with.  A few months ago, we studied crabs, and I thought how perfect an egg carton section would be for the carapace of a crab.

These snappy little crustaceans were a blast to learn about.  We borrowed multiple books from the library (our favorites being Crabs by Mary Jo Rhodes, The Magic School Bus Gets Crabby by Kristin Earhart, and A House for Hermit Crab by Eric Carle).  We examined hermit crabs at the pet store and found discarded crab legs at the beach. We watched a video about the amazing sandbubbler crab at National Geographic and learned about tiny crabs that help keep coral reefs clean at National Geographic for Kids.  In our research, we discovered that it is cruel to keep a hermit crab as a pet.  We learned about horseshoe crabs (not really crabs), spider crabs, and king crabs, but we decided that our favorite was the robber crab (also known as the coconut crab). Check out this video about this crab that likes to steal silverware and sneakers!

Now, let’s get on to making some cute little egg carton crabs.

DSC_0077

Here’s what you need to complete this project: two wooden spring clothespins, an egg carton section, paint, paintbrush, two flexible drinking straws, two pipe cleaners, two googly eyes, scissors, and glue (you can use school glue but I opted to use a hot glue gun for speed and security for the clothespin pincers.)

DSC_0084

First, you will paint your carapace (the egg carton section) and pincers (clothespins).  Some of my kids used lots of colors and lots of paint, and others were much more sparing. Allow to dry completely before moving on to the next step.

DSC_0099

Cut each pipe cleaner into four equal sections so that you have eight legs total. Cut the tops off each flexible drinking straw underneath the bendy part.

DSC_0089

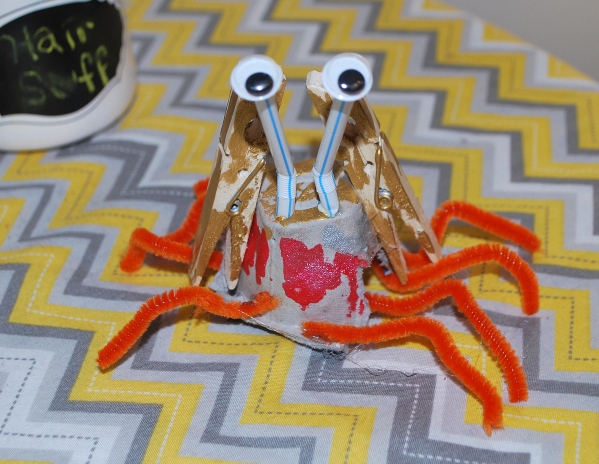
Start gluing your crab together.  I began with the pincers, asking the child how they wanted the pincers positioned on the body and then gluing them on.  I held them tight to the carapace for a few minutes while the glue set up.  Then I glued on the legs underneath the carapace, bending them out and then giving them a little bend in the middle for the “knee.” Finally, I glued the straws to the top of the carapace as eye stalks and added the googly eyes on top of those.

DSC_0102

These adorable crusty creatures make great decorations but can be useful as well.  Gabi’s crab sits on my kitchen windowsill and holds recipe cards with its pincers.  David gave his to his therapist, and she uses it at her desk to hold memos and photos.

And, if you are feeling pretty technical and want to be super accurate with your egg carton crab, go ahead and give him two more pipe cleaner legs.  Crabs are decapods, meaning they have ten limbs. We did eight because artistic license and all that. (and maybe I forgot that little fact when we were creating this craft?) Just maybe.

David and Autism Awareness

DSC_0024

Where does the time go?  Oh – laundry, dishes, meal times, snacks, playgrounds, play dates, learning, kisses, hugs, church, grocery shopping, bedtimes, baths, fishing strange things out of the toilet, avoiding the lego obstacle course on the way down the hall – oh yeah.  It makes sense now.

Still, I intend to squeeze my writing back into these crazy life.  I miss the outlet of writing down my thoughts and chronicling the adventures of our family.  Homeschooling takes a lot of time and work, yes, but I also want to write about it and share my ideas as well as my frustrations.  Autism is a journey with twists and turns that keep us on our toes, and I am disappointed in myself that I haven’t taken the time to write about where we are in that journey lately.

April, National Autism Awareness Month, would have been an ideal time to put up a blog post detailing the latest in David’s progress and improvements.  As I do every April, I chose a favorite photo of David from my albums and tinted it blue for my profile pic on Facebook.  David came up behind me while I was posting the photo.  “Hey, why am I all blue?” he questioned me, giggling a little.  I explained that April was a very special month, and in particular, I liked to join the “Light It Up Blue!” campaign each year to bring more awareness to autism.  He was very quiet after that explanation.  I thought perhaps he was confused by the word awareness and hurried on to clarify that it meant a knowledge of and interest in a subject or cause.  He interrupted me to say in a very matter-of-fact manner, “Huh.  I always thought autism was spelled with an and it’s actually an au! Weird.”

And that’s my David for you, always thinking about things in his way and often seeming to completely miss the point.  Later, I will often discover, he has absorbed what I said and will discuss it with me then, but in the moment, he will frequently choose to talk about something else, often unrelated.  His one-track mind can prove very useful in school when he is excited about the topic at hand.  Then he will spend hours immersed in the subject and willingly do writing and art and all sorts of things that he normally resists.  However, if  I am trying to change the subject, it becomes quite difficult and sometimes impossible.  This is a problem when we are all tired of hearing about Mega Man, Ice Man, Fire Man, Stone Man, and all the other characters that I ought to know by heart by now.  I am attempting to teach him to be more aware of others around him and to allow them to talk about their interests too.  This is challenging for him.  Even if he remembers to give the other person a chance to speak, he is impatiently waiting for his turn so he can get back to talking about what he is interested in.  Recently, at our church home group, I saw him walk over to a group of junior high girls.  He jumped right into his current favorite topic with no preamble and no room for anyone else to talk.  I watched, resisting the urge to step in and help.  The girls were doing their best to look attentive, but as the minutes ticked by and he showed no signs of winding down, they got a little desperate.  Finally, one of the girls interrupted him. “Hey, David, I bet you can’t count all the bricks in that fireplace,” she challenged him.  It worked!  While he turned to look at the fireplace and start counting the bricks, the girls made their escape to another part of the house.  He was unfazed by the girls’ evasion techniques and went on to find another unsuspecting victim. 🙂  In instances like these, I want to shout “He’s autistic, okay? He has a hard time going off topic and can’t read social cues!”  But of course I can’t.  It’s not an excuse, and I certainly don’t want people to pity him.  He has to learn how to operate in these social situations.  And how many times have I, his very own mother, pulled the same trick to get out of talking about the same topic again??

David turned eight at the beginning of April, and he is now standing as tall as my shoulders.  He is quickly changing from little boy to growing young man. He is making tremendous strides in physical therapy and occupational therapy.  In September, he could not catch a ball with one hand and could barely throw it with any accuracy.  Now he does both with confidence.  His balance is better, and his fine motor skills are improving. There is still a lot of work to be done to build up his core strength, but we are working on that with various exercises each week. When we were doing Monday School with our homeschool co-op, I received great reports from his teachers.  He had one class – an art and literature class – that he particularly struggled in because he gets easily overwhelmed by projects and creative thinking.  His teacher was patient and helpful, and he learned a lot.  I asked him what he learned and he said, “Not to take an art class again.” Ha!

People love being with David and working with him.  He is charming and sweet and really does love being with adults.  I love having a conversation with him, trying to get a glimpse into that complicated head of his.  I cannot imagine him without autism – it is an important part of who he is. We will always be looking for ways to help him and encourage him along this journey.  I feel blessed that God saw fit to give him to us, and I do not take my duty and my privilege as his mom lightly.

(For more information on communication difficulties and difficulty reading social cues for autistic children, check out this helpful link at Autism Speaks.)

Coffee Filter Crafts: Sea Turtles

DSC_0083

Last week, I woke up to a dreadful discovery: my Keurig machine was not working. After several desperate attempts to fix it, it became clear that a new machine must be purchased. Stat.   And so we carted away the old machine and said hello to a shiny, red, and most importantly, operable model to fuel my daily caffeine needs.  I briefly considered getting a regular coffee maker, but ultimately opted for the convenience and ease of a Keurig.  Therefore, my giant pack of coffee filters is still ready for crafting projects.

In keeping with our ocean animals unit study, we decided to make sea turtles next.  (You can find instructions to make coffee filter jellyfish here and coffee filter sea horses here.)  Sea turtles were a favorite to study around here – we probably spent over two weeks examining the lives and habits of these cute sea creatures.  We borrowed lots of sea turtle books from the library – my favorite was Turtle Summer: A Journal for My Daughter by Mary Alice Monroe.  It tells a real-life story of a mom and her daughter helping sea turtle babies get to the ocean safely with beautiful drawings and photographs of sea turtles and other ocean life.  There are fun and thought-provoking activities included at the end of the book.  Of course, we also love the drawings and easy-to-understand text of Gail Gibbons’ books, and her Sea Turtles is no exception.  For our online resources, I found this link to a free sea turtles unit study and used some of its printables, like the Sea Turtle Anatomy Matchbook.  The kids enjoyed tracking sea turtles on SEATURTLE.ORG.  Sea World’s website also had a lot of information on sea turtles for the kids to practice looking up.  Netflix and Hulu and YouTube are all great resources for sea turtle videos – this one was my kids’ favorite: 

All right, let’s make some super cute sea turtles!

DSC_0068

Here’s what you will need: lima beans, washable markers, styrofoam bowls, chalk pastels, craft glue, paper, and of course, coffee filters.

DSC_0071


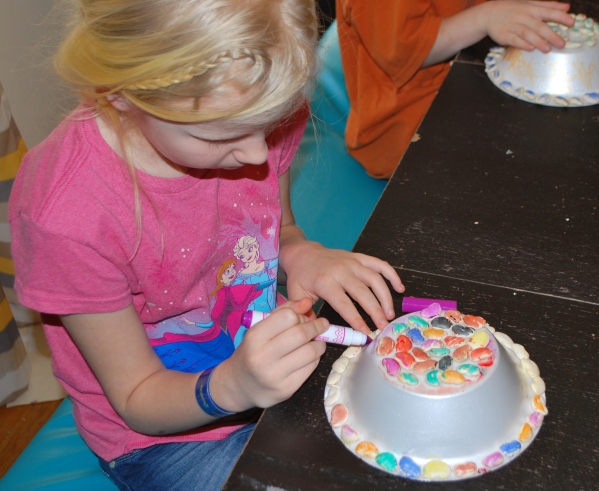
First, flip the bowl upside down and glue lima beans all over the top and around the rim of the bowl.  Let dry completely before going to the next step.

DSC_0075

Next, get out those markers and color all over those lima beans!  (Painting them would work too, but we needed a break from painting around here.)

DSC_0078

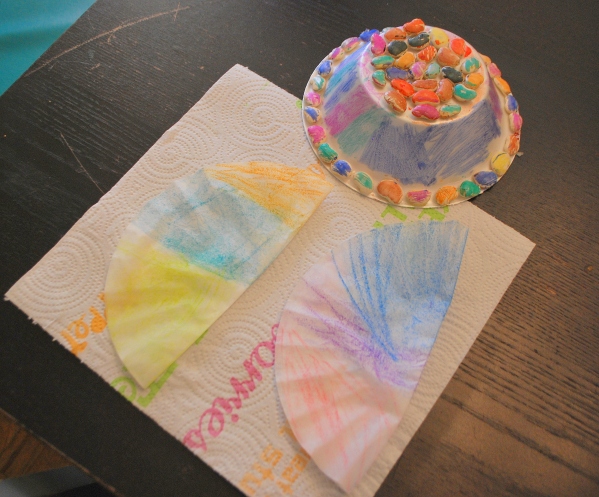
Now, take two coffee filters and fold each of them in half. Color them with your chalk pastels however you like.  To keep the chalk dust from rubbing off your sea turtle project, spray the filters with a fine mist of aerosol hairspray.

DSC_0081

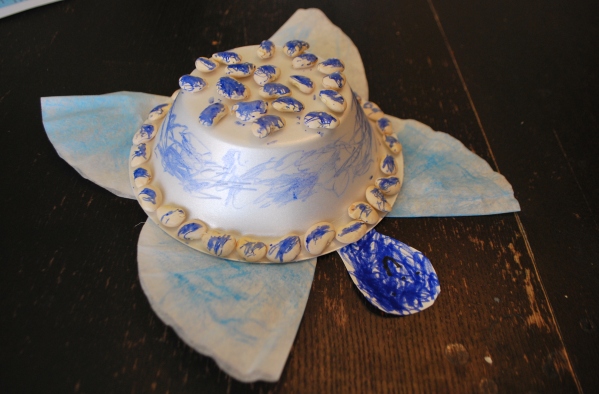
Then, cut each of your folded coffee filters in half and glue them to the underside of the turtle’s body (the bowl) as shown.  Cut out a triangle shape and a turtle head shape from your paper and glue on in the appropriate spots.

DSC_0091

DSC_0090


Use the markers to decorate the turtle head and tail.  Your colorful sea turtle can sit (swim, I mean!) nicely on a shelf, or you can use thumb tacks to hang it on the wall.

Did you know that leatherback sea turtles can weigh up to 2,000 pounds?  That’s like half my minivan!  Thankfully these coffee filter sea turtles are a lot lighter (and a lot cuter than the leatherback, in my opinion!)


Crystal Science: How to Make Your Own Magic Crystal Coral Reef

DSC_0052

A few months ago, the kids and I played around with making our own crystal snowflakes. (how to and amazing results here)  It really had nothing to do with anything we were studying but hey, it was winter and we weren’t getting any snow so we needed to make our own. Or something like that.

Anyway, we loved growing the alum crystals.  I spent some time on Pinterest looking for other ways to grow crystals.  Currently, I have pinned to my Science board to try these sparkly crystal geode eggs (good Easter project, anyone?) and these overnight crystal gardens.  While I was perusing the many ideas on the internet, and pondering many sciency things, I remembered the magic crystal trees that I had purchased as a kid and then grown at home.  Does anyone else remember these?  Apparently, there are still versions of those scientific little wonders for sale.  When I saw the familiar puffy crystal branches, it immediately made me think of coral.  What if we could grow our own magic crystal coral reef?  That would fit in perfectly with our ocean unit study.

If you search “how to make your own magic crystal tree,” you’ll find dozens of websites with clear instructions.  It seemed like it would be fairly easy to adapt it to a piece of coral instead of a pine tree.  And so we attempted to make our own crystal coral reefs with fantastic results.  Get these supplies if you want to try it for yourself:  one or two pieces of cardboard, table salt, ammonia, Mrs. Stewart’s bluing, scissors, pencil, water, food coloring, and a glass dish.

DSC_0017

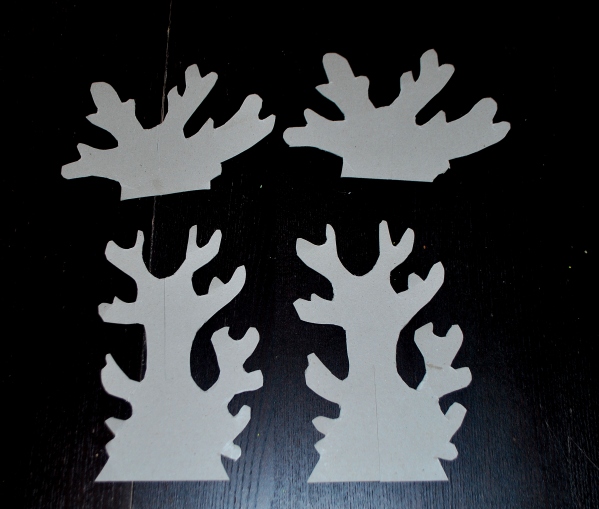
First, you will need to draw and cut out your coral shapes from the cardboard.  (Note about the cardboard:  it cannot be coated, like cereal box cardboard, and should not be too thin, as it would fall over with the weight of the crystals.  I used the cardboard backs of some legal pads I had.  They worked perfectly.)  The kids looked up pictures of various types of coral online and chose two different ones to draw.  Draw it once on the cardboard, cut it out, and then trace it again on the cardboard to be cut out a second time.  You can see that we tried a short coral version and a tall one.  Don’t make it too tall!  Cut a slit from the bottom center of one of your cardboard pieces halfway up the design.  Cut another slit on the other piece of cardboard halfway down the design.

DSC_0021-001

Now you can put your pieces together to give your coral a 3D effect.  Simply slide the two slits together and spread the piece apart until they stand nicely, as in the photo above.

DSC_0023

Next, it is time to mix your solution.  (A word of warning: keep your work area well-ventilated as ammonia has a very potent odor!)  In your glass dish, mix the following:  3 TBS bluing (get it in the laundry section of your grocery store), 3 TBS water, 3 TBS salt, and 1 1/2 TBS ammonia.

DSC_0024-002

Then drip some food coloring over your cardboard coral structure and carefully place it into the solution in your glass dish.

Now comes the waiting part, but don’t worry, you won’t have to wait long.  The next day, Mikey came racing into my room shouting that I needed to come and see the coral now.

DSC_0025-001

Sure enough, tiny delicate salt crystals had gathered on all the points of our cardboard coral reefs.  It is near impossible to avoid with over-excited children, but please do your best to not touch or bump the crystals in any way.  They are extremely fragile.

Two days later, the tiny salt crystals spread out over the cardboard a little more.

DSC_0028

DSC_0034

The kids were delighted to find blue, green and yellow tinged crystals sprouting up everywhere.  For some unknown reason, the crystals were unaffected by the red food dye.  In a few more days, the shorter coral structure was almost completely covered in crystals while the taller structure experienced crystal growth about three-quarters of the way up.

DSC_0056

At this point, the finely detailed, sharply pointed crystals of the first two days softened into a more pillowy design.  Doesn’t it look a lot like coral?  Check out the similarities:

white-coral-mary-deal

(White Coral, fine art photograph by Mary Deal, from fineartamerica.com)

The crystals do not last more than a few days before they start falling and shattering into little piles of powder.  However, seeing a simple piece of cardboard burst into hundreds of beautiful little crystals is pretty amazing.  And of course, being a good, responsible homeschooling mom, you are going to want to know the science behind it all, right?

We already talked about crystals and how they form in this post.  In this experiment, crystallization does take place, but only after some other scientific processes occur first.  The first process that has to happen is capillary action.  That’s really just a couple of fancy words to describe how liquid sometimes defies gravity and goes up instead of down.  In plants, water can travel up thin tubes called capillaries to give the entire plant the necessary hydration for survival and growth.  You can see this happen when you stick a stalk of celery into a glass of colored water.  If the tubes are skinny enough, the surface tension of the water enables it to basically “climb” up the walls of the tubes.  Liquids will also climb the fibers of a piece of paper or cardboard.  This video is a great demonstration of this:

In our coral crystal growing experiment, the solution in the glass dish climbed up the fibers of the cardboard.  That’s when the next scientific process took place – evaporation.  Evaporation is the process of liquid molecules escaping and becoming gas molecules instead.  We put ammonia in the solution because it evaporates much faster than water.  The ammonia and the water molecules escaped the cardboard and became gas molecules.  The bluing and the salt were left on the cardboard to begin the next process – crystallization.  Because the solution was so saturated with the bluing molecules and the salt molecules, these molecules are able to combine and form crystals, much like we discovered in the previous post about crystals.  The bluing is a colloid, which is one substance that has another substance evenly dispersed throughout it.  Some good examples of colloids are mayonnaise, our blood, and hair gel.  (You can watch this little video by Martha Stewart on how to make your own colloid with starch and water that does some pretty cool things!)

Oh, and since this is part of our ocean study, it might be a good idea to study up on coral – what is it, where do you find it, and why is it important to the earth?  There are lots of resources online for this, but I’ll leave you with two.  First, here is a link to a free homeschool unit study on coral reefs.

OLYMPUS DIGITAL CAMERA


And, as always, here is a short but educational video on coral reefs:

Have fun learning about these magnificent structures of the deep as you make your own magic crystal coral reefs!

Art Journaling: We Will Not Fear

DSC_0019-001


. . . though the earth be removed, and though the mountains be carried into the midst of the sea;  Though the waters thereof roar and be troubled, though the mountains shake with the swelling thereof.  Selah.  There is a river, the streams whereof shall make glad the city of God, the holy place of the tabernacles of the most High.  God is in the midst of her; she shall not be moved: God shall help her, and that right early.  Be still, and know that I am God: I will be exalted among the heathen, I will be exalted in the earth.  The Lord of hosts is with us; the God of Jacob is our refuge. Selah.  Psalm 46:1-5, 10-11

Coffee Filter Crafts: Jellyfish

DSC_0106-001

If your kids had fun making the coffee filter seahorse craft, they will certainly enjoy adding these jellyfish to their art aquarium.  They are made with the same technique of washable markers and water and have long tentacles that sway in the breeze.

The topic of jellyfish made an engaging subject in our ocean animals unit study.  As with the seahorses, we borrowed some books from the library to begin our quest for information on these magnificent creatures. (Jellyfish by Louis Spilsbury, Box Jellyfish: Killer Tentacles by Natalie Lunis, and Portuguese Man-of-War: Floating Misery by Natalie Lunis.)  We followed these books up with some videos on YouTube so that we could actually see jellyfish in action.

Here are ten things you may not have known about jellyfish before:

1.  A jellyfish does not have a brain.

2.  Jellyfish come in all sorts of colors: pink, blue, red, even multi-colored.

3.  A jellyfish’s body consists of a polyp, or float, on top and many tentacles dangling below.  The mouth is underneath the polyp.

4.  A jellyfish’s tentacles are filled with toxins used to hurt or paralyze their prey, which can be little fish, other jellyfish, crabs, and plankton.

5.  A group of jellyfish is called a bloom, a swarm, or a smack.

6.  Some jellyfish can glow in the dark.

7.  Jellyfish are a favorite snack of sea turtles.

8.  The Portuguese Man-of-War is not actually a jellyfish.  It is a group of organisms that live together and function together as a whole.

9.  Most jellyfish have a life-span of a few hours to a few months.

10.  Jellyfish range in size from very tiny (thumbnail size) to very large (whale size).

Now, let’s make some coffee filter jellyfish.

You will need: 2 coffee filters, washable markers, water, a paintbrush, a paper plate,  plastic grocery bags, a stapler, party streamers, and some tape

DSC_0107

First, lay your coffee filters one on top of another on the paper plate. Color dots and swirls and scribbles however you like (just like we did when we made the seahorse) on the top coffee filter with the washable markers.  Then, with the coffee filters still stacked up on top of each other, paint over the top filter with water until the colors are swirled to your satisfaction.

DSC_0109

When the coffee filters are dry, staple the outer edges together as shown, leaving a small opening on one side.  Insert the plastic grocery bags into the opening until the polyp is nice and full and then staple shut.

DSC_0106

Next, cut varying lengths of your party streamers and tape to the bottom of your coffee filter polyp.  (I found a couple of rolls of blue and yellow in the junk drawer, so blue and yellow it was for us!)  Use fishing line or thread to hang your jellyfish from the ceiling.

For a short while, we hung our jellyfish in the entrance of our dining room.  They added a beautiful pop of color and a touch of movement to the area, but they were too distracting when you had to walk underneath them.  We ended up moving our jellyfish to a safer location in a corner of the dining room instead.

Get creative!  Think another material besides party streamers would work for the tentacles?  Try it and see!  As with many other ocean animals, the different types of jellyfish vary widely in shape, size, colors, textures, and even the way they move.

And while you are creating your jellyfish masterpiece, you may want to try reading aloud Jeremiah Jellyfish Flies High by John Fardell.  It’s a funny picture book for the kindergarten set but will be sure to entertain the older kids as well.


Creative Ways to Connect With Your Kids: Love Languages

DSC_0354-002

Two weeks ago I posted about a special way I had discovered to use in communicating with my oldest child. (If you missed it, you can read here about the mom/daughter journal we started.)  Today I am continuing this series about connecting with your kids by writing about another child of mine.  This boy is the funniest kid and has amazing talents in a lot of areas.  If I give him video game time undisturbed, he is the happiest boy on the planet.  When you first meet him, you might mistakenly assume from his personality that he loves to be the center of attention.  While he can definitely be louder than life, my little man often disappears to get some quiet time and is most content when he is left alone.  He is my earliest riser, getting himself some cereal and curling up on the couch underneath a quilt to eat by himself.  It has been quite the challenge to find a way to connect with this solitary boy.

One day while casually scrolling through Facebook, I stopped at one of my favorite homeschooling pages, Simple Homeschool.  There was a picture of a red heart with the title “The Five Love Languages of Homeschooling”, and underneath Jamie had captioned it: “Have you discovered your child’s love language? It might just be the homeschooling break-through you need.”  Intrigued, I clicked through to the post on Jamie’s blog and began to read.  Many years ago, I had taken Dr. Chapman’s love language test and found that mine was words of affirmation.  I had never considered the love languages to be pertinent to kids, but the more I contemplated it, the more it made sense.  There are five general love languages: words of affirmation, acts of service, receiving gifts, quality time, and physical touch.  Jamie started off her post speaking about the love language of physical touch.  The first two sentences jumped out at me: “A child who best receives love through physical touch desperately needs hugs, kisses, and pats on the shoulder.  Not having enough can leave them feeling that they’ve done something wrong and that you are not pleased with them.”  Somehow I felt immediately that these sentences were describing my Mikey.  Physical touch?  Well, he had been a little cuddle bug when he was just a baby, always pleased to be in my lap with his head nestled near my heart.  But surely physical touch was not what he needed now.  If so, why did he always disappear and crave his alone time?  God’s voice persisted in my head.  “Yes, this is the key to your boy’s heart.”

I wasn’t so sure of this discovery.  I thought perhaps it was a wild guess, a shot in the dark in an absurd attempt to make a connection with my younger son.  So I prayed, and God said, “Do it!”  I decided to conduct it as an experiment of sorts.  Over the next several days, I would be very intentional in giving him high fives, hugs, fist bumps, back rubs, etc., and see how he received it.  I am by nature a very touchy-feely person anyway; so it wouldn’t be too much of a stretch for me, but I hoped it wouldn’t be off-putting to Mikey or push him even further into his solitude.  The first day, I gave him extra hugs as he came stumbling into the kitchen to make his breakfast.  I offered to sit and snuggle with him on the couch while he ate.  To my surprise, he accepted.  Throughout the school day, I made sure to pat his back, touch his hand encouragingly when he was struggling with a word, and invited him to sit on my lap while we did reading.  The next day went much the same way, except this time I could feel him leaning in as if asking for more.  By the third day, he was actually seeking ME out for hugs and kisses and “love you Mama”s with his face buried in my neck.  I was astonished at the change in my kid.  The more we physically connected throughout the day, by hugs, shoulder pats, etc., the more he opened up and the less he crept away to his room for quiet.  Even his grandma noticed this change in him.

Now that I know with certainty that physical touch is my son Mikey’s love language, I need to make sure that I am “speaking” to him often in that language.  It fills up his love cup and spills over to the others in his life.  He is kinder to his siblings, more thoughtful to others, more expressive of his thoughts and desires, and more open to God’s work in his life.  He was a fantastic kid before we started this experiment; now he is a fantastic kid that feels loved and connected to in all the right ways.

I encourage you to take the time to find out your child’s love language.  If your child is old enough, they can take this online quiz at Gary Chapman’s website to help you both figure it out.  The time spent evaluating and determining their love language and then implementing it will be paid back in dividends you can’t imagine.

5LLChildren-lg

(Also, as it turns out, there is a love languages book just for kids.  I think this one is going to be added to the Foster family library!)

Super Cool Melting Ice Experiment

DSC_0038-002

Lately, we have been up to our ears in ocean animal books and projects and notebook pages.  Apparently, it is a science subject that is going to stick around for a while.  But that doesn’t mean that we can’t get sidetracked every now and then.  Honestly, it’s one of the beauties of homeschooling.  Your child suddenly shows interest in something, you go with it, and the learning happens!  Not a bad formula in my book.

A while back, the kids and I participated in a “Brain Break” at one of our local churches.  It is hard to explain a “Brain Break” in just a few sentences, but basically the church uses it as an outreach to the schools in the area.  When there is no school because of a holiday or teacher in-service day, the church provides a full day of care for the students whose parents can’t afford to take off work for that day.  They feed the kids breakfast and lunch, do crafts, games, activities, science experiments, and more.  It is an amazing opportunity to serve others and to share God’s love with the kids.  I got to serve in a room where we taught the kids how to make their own snow globes before doing a fun melting ice experiment with them.  The experiment was a simple concept, but it held a definite wow factor for the kids.  My boys had a chance to try the experiment at “Brain Break” too, and they talked excitedly about it all the way home.  I decided we would replicate it at home.  I thought of a few modifications that would make it even more fun, and that night I secretly filled up four balloons with water and put them in the freezer.  The next day we popped those sparkling balls of ice out of their rubber casings and using salt and some food coloring, we conducted our science experiment and did a little art, too!

Want to get in on the fun?  You will need: a balloon, water, a large bowl, salt, and food coloring or liquid watercolors.  That’s it!

Fill your balloon with water, tie it off and put it in the freezer.  (Tip: put your water-filled balloon in a bowl in the freezer so that it does not get lopsided or ridged from your freezer shelves.) Let it freeze in there overnight in preparation for the experiment.  SCIENCE TIME:  How does the water change from a liquid into a solid when it is put into freezing temperatures?  You might already know that water is made up of molecules moving freely around, filling the space it occupies. Those molecules have three atoms each – two hydrogen atoms and one oxygen atom.   When you put water into a place that is 32 degrees Fahrenheit or lower, the molecules stop moving so quickly.  The cold slows them down.  Eventually they slow down to an almost standstill.  The oxygen atoms establish an organized pattern like crystals (remember those?), but the hydrogen atoms are rebels and go wherever they please.  This is why water expands, or get bigger, as it freezes.  If you put a bottle of water in the freezer with the cap screwed on tightly, it could explode from the water expanding as it freezes.

The next morning, put your frozen water balloon in a large bowl. (I have several colorful plastic bowls from the dollar store that we use for various occasions, and they worked perfectly for this experiment.) Use a scissor blade or knife to slit open the balloon and remove the rubber from your ball of ice.

DSC_0021 DSC_0024

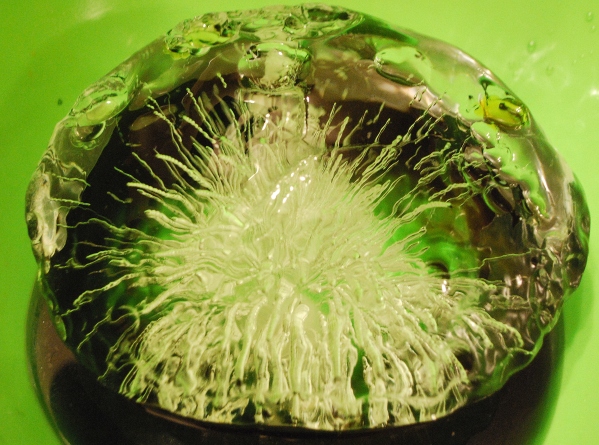
Just doing this will produce some “This is so cool!” responses or whatever the kids are saying nowadays.  Before we went any further in our experiment, I challenged the kids to hypothesize why there were these beautiful, sea-anemone-like structures inside our balls of ice.  Gabi guessed that it was the flow of the water as I filled the balloons.  David thought that maybe the water started turning to ice at the bottom and then moved out to the sides as it froze.  SCIENCE TIME:  Those were great hypotheses, but here’s the real reason for those crystalline structures inside the ice.  It may have seemed that I filled my balloon completely with water, but as I tied it shut, there was some air trapped inside the balloon.  If you look carefully at the first photo (the red one), you can see that the structure is actually made of hundreds of tiny bubbles strung together.  Those bubbles are the air trying to escape while the water froze.

Now comes the fun part.  Ask your kids to list some ways to melt or get rid of ice.  The kids at “Brain Break” certainly had some interesting answers to that question!  Inevitably, especially if you live in an area where snow and ice abound, someone will mention salt because they have seen it sprinkled on sidewalks and spread on streets during freezing winter weather.  Salt is what is used in this particular experiment to melt ice. So scatter (don’t dump!) some salt over the top of the ball of ice. The next part is hard – waiting for a few minutes while the salt starts to do its thing.  It’s a good time to discuss – SCIENCE TIME:  How does salt melt ice?  Here’s a quick video to explain it:

Or, if you want the Cliffs notes version, salt lowers the melting point of water.  Its atoms of sodium and chlorine disrupt the hydrogen and oxygen atoms of the ice and cause it to slowly break apart.

You may not be able to see the melting of the ice initially.  That is where your food coloring comes in.  We used food coloring because that’s what I had on hand, but if you can get liquid watercolors, I would recommend that.  Unless you like having rainbow-stained hands, then, by all means, copy us and use the food colors.  Choose a color and carefully squeeze a few drops over the top of your ball of ice.

DSC_0025 DSC_0035 DSC_0038


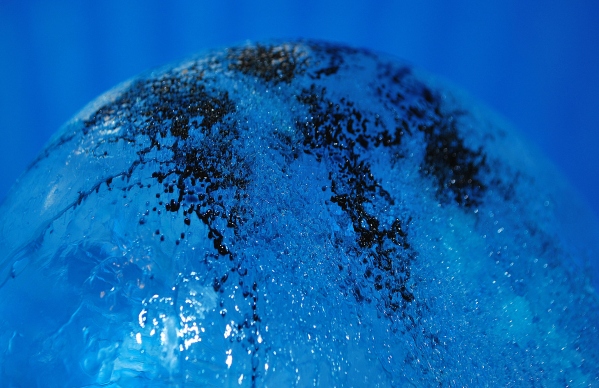
The salt actually sinks into the ice as it pushes aside the water molecules.  When the color is added, it drips down into these little pockets left by the salt.  This is clearly the art part!  Wait a little while and then add a few drops of a different color.  Try adding a little more salt.  You will notice that after each time you add salt, the surface of your ball of ice will become more dimpled like a golf ball.  It would take salt alone a very long time to melt this ball of ice.  It works more on the surface, which is why it is used on icy roads and walkways.

Other factors are at work in melting the ice.  Consider the temperature of the room you are in.  Is the sun shining through the window and perhaps directly on the ice?  Have you touched the ice at all with the warmth of your hand?  Now leave your ice alone for a while.  We went out to the library and the park before returning to see how our balls of ice were faring.

DSC_0045 DSC_0050 DSC_0051 DSC_0055

You can see that our ice now resembled alien brains, as Mikey pointed out.  The tiny pock marks left by the salt had widened into larger pits like the finger holds on a bowling ball.  The water trickled down the sides in a snaky fashion as it twisted and turned around all the salt holes.  We added more color, which pooled up in the salt holes and streamed down the squiggly paths left by the melting ice.  We again left it alone for a while and came back to see new designs and patterns etched into the ice.  Each time we checked the ice, we were given a new art piece to admire and enjoy.  The kids left out their ice all night, and in the morning they came out to see their bowls filled with dark, cold salt water.

It was such an enjoyable and educational experience that we want to do it again.  What if we use something else beside a balloon to contain the water?  What will happen if there are substances in the water before it freezes?  What will the melting process look like if we use a hair dryer instead of salt?  There are a great many more possibilities, and my little scientists are eager to explore this new world of solids and liquids with more experiments.